How to do CRUD operations in D365FO using Power Automate?
In this article, I will be showing you how to use Power Automate in order to do CRUD (Create, Read, Update, Delete) operations inside D365FO.
- Login to https://make.powerautomate.com
- Click on "Create", then click on "Instant cloud flow"
- Name the flow, choose how to trigger the flow, then click Create
- Click on the "+" sign, then click "Add an action"
- Look for "fin & ops" connector and click "See more" to see all actions for it
Create Record
- Choose "Create record"
- Choose "Authentication" method and fill other field values, then click "Create new"
- Here, I chose Authentication method as "Service principle"
- Choose your connection name
- You need to fill the Client Id, Client Secret and Tenant Id from the app registration

- If you don't have an azure app registration created, then you will need to create a new one. You can check my detailed article on how to create one How to create App Registration in Azure?
- Make sure the Client Id is defined in D365FO environment, by going to System Administration - Setup - Azure Active Directory Applications
- In order to get the ClientId:
- Sign in to https://portal.azure.com
- Go to App registrations and choose your application, where you can find the ClientId
- In order to get the client secret, click on your app, go to "Certificates & secrets" and take the secret value. Or contact your admin to give you the values
- You can get the Tenant Id by clicking on your app registration to get more details
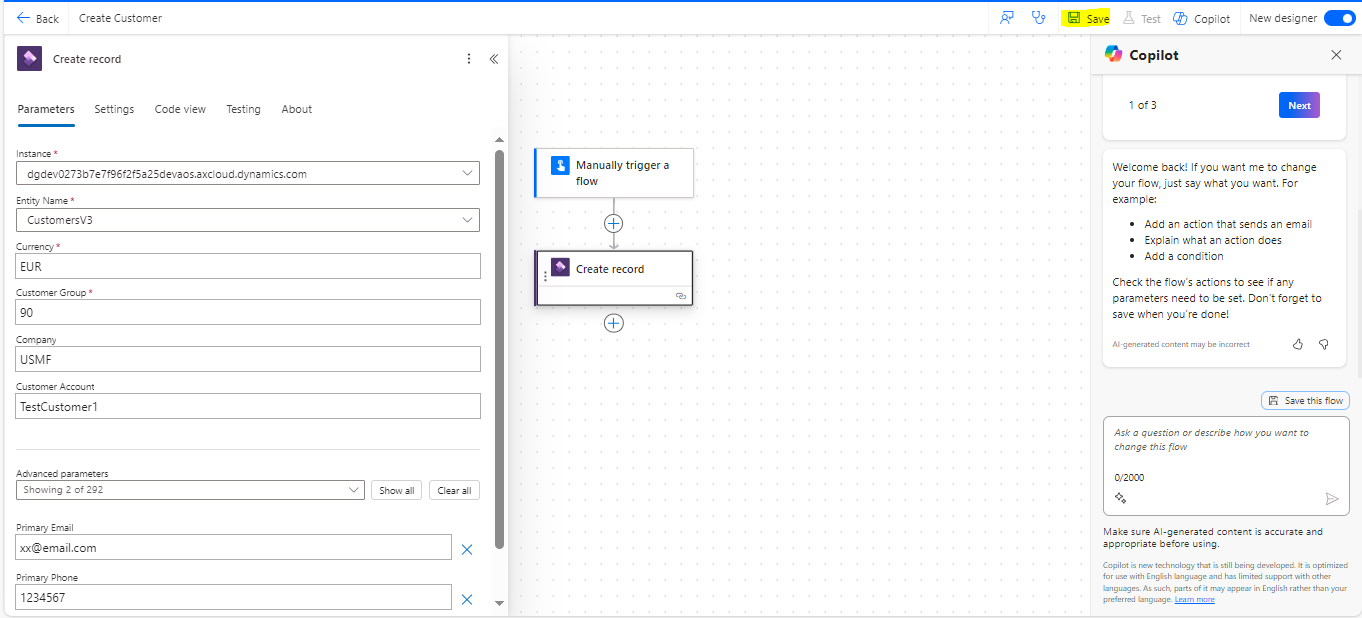
- Fill the following fields:
- Fill the environment url in the "instance" field
- Fill the entity name "CustomersV3" (which is the entity public collection name)
- Once you fill the entity name, the important fields of the entity will appear below it, with the option to fill extra fields as well:
- You need to fill "Currency" because this field is mandatory in this entity
- You need to fill "Customer Group" because this field is mandatory in this entity
- You can fill the "DataAreaId" field. If you leave it empty, then it will take the default dataAreaId of the user connected to the ClientId you defined in FO
- You need to fill the "Customer Account"
- You can fill more fields, by clicking on the "drop down" of "Advanced parameters"
- Once you filled all values, click on Save
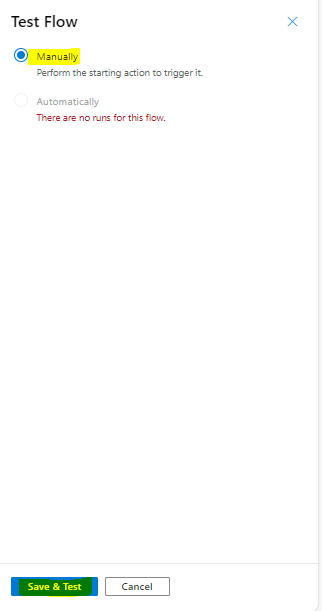
- Now we can test our flow by clicking on "Test"
- Choose the "Manually" option, then click "Save & Test"
- Click "Continue"
- Click "Run flow"
- Click Done
- I got an error, that I need to fill "Organization Name"
- Click on "Edit" in order to fill the organization name field
- Click on the "Create record" to open the dialog, then go to advanced parameters to add the "Organization name"
- Fill the "Organization name" value
- Now save your flow again, then repeat the steps from 5 to 9 to test the flow. The test ran successfully this time.
- Now go to your FO environment, to make sure that the customer got really created with the values you inserted.
Read Record
- Repeat steps from 1 to 4 to create a new "instant flow" and name it "Read Customer"
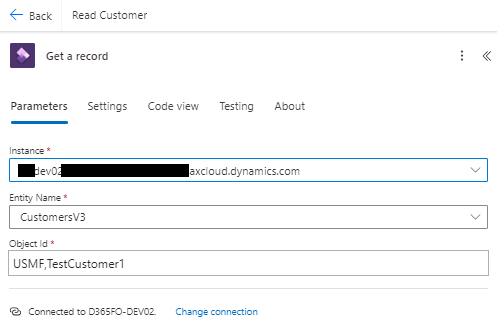
- Add the "Get a record" action this time
- Fill the FO environment url, the entity name and the Object Id (which is the dataAreaId and the entity key which is customer account)
**Here I will read the data for the customer that we created earlier which is "TestCustomer1"
**Separate the values of DataAreaId and CustomerAccount with a comma and don't put a space after the comma - Now you can save your flow and click on test, in order to see if it's working properly. (you can follow the test steps we did for the "Create record" from 4 to 9). You will see it ran successfully
- You can see the output of the read by clicking on "Show raw outputs":
Update Record
Let's say we want to update the currency and the primary email for the "TestCustomer1" we created.
- Repeat steps from 1 to 4 to create a new "instant flow" and name it "Update Customer"
- Add the "Update record" action this time
- Fill the following fields
- Fill the environment url in the "instance" field
- Fill the entity name "CustomersV3" (which is the entity public collection name)
- Fill the Object Id (which is the dataAreaId and the entity key): USMF,TestCustomer1
- Once you fill the entity name, the important fields of the entity will appear below it, with the option to fill extra fields as well:
- Fill the currency with "USD" to update the original value that was EUR
- Fill the customer group with the original value which was "90"
- Fill the dataAreaId with"USMF"
- Fill the customer account with "TestCustomer1"
- Now you can save your flow and click on test, in order to see if it's working properly. (you can follow the test steps we did for the "Create record" from 4 to 9). You will see it ran successfully
- You can see the output of the update by clicking on "Show raw outputs":
- You can also go to your D365FO environment to check if the values got really updated
Delete Record
Now let's delete the customer we created "TestCustomer1"
- Repeat steps from 1 to 4 to create a new "instant flow" and name it "Delete Customer"
- Add the "Delete record" action this time
- Fill the FO environment url, the entity name and the Object Id (which is the dataAreaId and the entity key which is customer account)
**Here I will delete the customer that we created earlier which is "TestCustomer1"
**Separate the values of DataAreaId and CustomerAccount with a comma, and don't put a space after the comma - Now you can save your flow and click on test, in order to see if it's working properly. (you can follow the test steps we did for the "Create record" from 4 to 9). You will see it ran successfully
- Now if you go to your D365FO environment, you'll see that the "TestCustomer1" doesn't exist anymore
.png)


Comments
Post a Comment